VR
360° content applications - how do they work and how to develop them?
Applications working with 360 ° photos and videos - how are they created and on what principle do they work? Find out information about technical side of 360 ° media files and applications.
Applications using 360 ° photos and videos - how are they created and on what principle do they work? We will explain it in this article focused at technical side of 360 ° media files and applications. This article is based on the development of such applications in the Unity game engine, however, the principles and procedures described here can be applied in any development environment.
360 ° content applications are applications designed primarily for the consumption of 360° media content obtained using a 360 ° camera. They can be consumed on all types of devices - phone, computer, TV and VR headsets. Control is defined by the type of device used - mouse / touchpad, touch screen, controller, gyroscope (device movement) or automatic presentation. Media files can be linked to any user interface.
360° photo and 360° video play a major role
360° photos and videos are often displayed in 2D dimension in equirectangular projection . You can think of this as a globe (world map) unfolded into a 2D map. You will certainly remember the world depicted in this way from Geography classes at primary school. In the case of photographs and videos, these 2D projections are slightly "strange", anyway 360° content is not about 2D - it is about perfect feel and simple realistics consumption in 3D view mode. That may be achieved only by rendering the images on the sphere surface.
How does it work?
The principle is very simple. Imagine a round room with a data projector placeed in its center. This projector radiates an image in all directions and the resulting projection is visible over the entire inner surface of the sphere. Let's turn it around now. Let's say that the surface of a given sphere is not a wall, but a screen showing the same image. And instead of a projector, we have a freely rotating camera connected to the movements / controls of the device we watch the image of the camera on.
How to create such sphere with 360° content files in Unity?
Unity game and application development software is natively ready for 360 ° photo and video formats. Technologies, procedures and the resulting possibilities are discussed in the following steps.
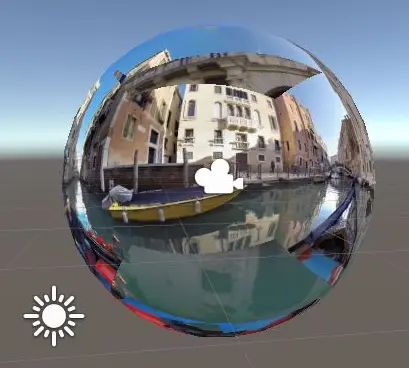
Projection on the inner surface of a sphere
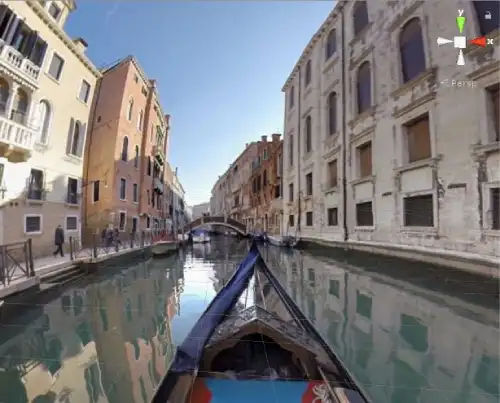
 View from the sphere
The geometric body of a sphere can be created in Unity simply via the menu Create object → 3D → Sphere. By default, any Unity body is created as a solid body and works only with its outer surface. This property is based on the default material assigned to the body. For our needs, we must replace the material of the sphere with our own - we would need one that will take into account only the surface of the body. Logically, in classic applications, we would work with a material with an attached surface shader, in the setting of which we would choose to render to the inner side of the surface. However, it is not used for working with textures, instead we can use the Skybox / Panoramic shader in the case of videos and Skybox / Cubemap for photos. Of course there is also the possibility of using own shaders, the code for one such can be found in this discussion on StackOverflow . The shader can be used for both photos and video.
Camera in the center of the sphere
 Camera in the center of the sphere
We place a camera in the center of gravity of the sphere, on the surface of which we project. The camera will reflect the rotation requirements coming from the device through its controller. For example moving with mouse, touching touch screen, or rotation of a VR headset.
Applications for viewing 360 ° photos and cameras usually work with only three degrees of freedom - the observer is allowed to look around the space and at the same time rotate with the camera. (The camera / observer's head is always at the point from which the observed record or picture was taken).
If there is not used a camera defined by a kit for a specific device (eg VR headset), Unity documentation recommends to do not move and rotate directly with the camera object, instead place the camera itself into an empty parent GameObject and manipulate with directions just of this object.
If you use built-in Unity shaders, don't forget to switch from "Clear flags" to "skybox" in the camera settings. The procedure using the built-in shaders described above and rendering to the surface of the sphere is the same as the simplified procedure described in the article below. The only difference is that our environment is defined by a specific sphere instead of the whole scene.
The user interface

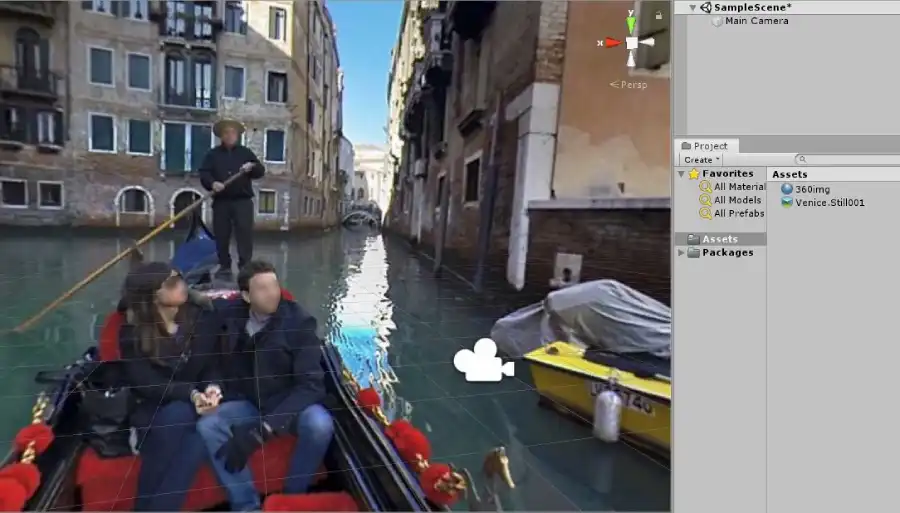
 Photo supplemented by an interactive harbor and a flying bird
The resulting connection between the camera and the space can be supplemented by any objects and animations, both in space and in a 2D layer at the camera level. We can even work with perspective (distances of bodies / animations inserted in this way from the camera) and thus create "3D" visual effects. Thanks to the holding of fixed dimensions and positions (camera, projection sphere, size of objects), a permanent and natural appearance of the added elements is achieved in all circumstances. For example, the attached image adds an interactive dock point for crossing to the mainland and a white bird for a bird's eye view.
When using interactive elements, it is necessary to define specific types of interactions and their connection with specific hardware drivers using the input manager.
Practical example
If we do not directly consider applications for browsing and viewing 360 ° photo and video content, the use of 360° formats can be used e.g. to create a background layer of all kinds of applications. A very interesting area are the so-called virtual tours, which combine several photographs of the space taken from places with a short distance from each other. These individual photographs are then linked to each other for an easy and natural-looking transition between them. Using Unity for such a purpose has the advantage of complete freedom - you can develop and deliver any functionality you require. In contrast, there are a number of tools and services that are able to generate such tours from uploaded photos completely automatically.
Seems good, can it be simplified?
Yes, it can! With this solution, we do not use any manually created space in the form of a sphere and we project our 360° content within the complete Unity scene environment. In this case, the user interface is solved by means of a canvas layer inserted in front of the camera level. The procedure is as follows:
360° Photography
- We will insert a 360° photo into the Unity project. In its inspector window, switch its texture shape from "2D" to "Cube".
- We will create a new material and assign it a "Skybox/Cubemap" shader. Now we place the photo from step 1 into our material's "Cubemap (HDR)" slot.
- In the "Lighting" window (window → rendering → lighting settings), on the "scene" tab, change the "Skybox material" for the material created in the step 2 and the app is done!
360° Video
- We will create a rendering texture (Create → Render texture) and set its size to the size of our 360° video.
- We will create a material (Create → Material) and choose its shader on "Skybox/Panoramic". We insert the rendering texture from step 1 into its "Spherical HDR" slot.
- It's time to create a video player object (Create → Video → Video Player). Set its render mode to option "render texture". Now take the texture from point 1 and place it into "Target texture" slot of the video player. Into its next free slot called "Video clip", insert a 360° video you want to display.
- In the "Lighting" window (window → rendering → lighting settings), on the "scene" tab, change the "Skybox material" for the material created in the step 2. After switching to play mode, the video should play.
 360° image displayed with minimum resources
Note: Unity and similar software use 360° photos and videos as final files and do not allow any their modification except few basic ones. So upload all media as they should be displayed in the app. Editing 360° videos is possible, for example, in Pinnacle studio.