XR framework for Unity
Simplify and accelerate the development of XR applications thanks to GameArter's framework built on the top of XR Interaction Toolkit from Unity.
- XR Rig with required functionality on few clicks (no coding needed)
- Warning from missing dependent scripts required for certain functionality
- Open source, simple, optimized, easy to read and modify code
- Ready to use scripts for various features, helper scripts for development


GameArter's XR framework is being developed for our own need of development VR applications for companies which is service we provide under brands GameArter VR and VRapps.cz.
The framework is designed to be performance optimized, logically structured and independent in use. It's purely based on XR Interaction Toolkit and main added value is existence of pre-created / generic components using multiple objects and scripts from the toolkit. Together with protection mechanisms from forgotten dependent scripts, GameArter's XR Framework helps speed up development and eliminate errors.
Documentation
XR Framework Installation
XR framework is written to work on the top of Unity's packages. Before you start...
- Open Unity with your project (ideally with active Universal render pipeline)
- Be sure you have installed "XR plugin Management" and active your XR device (e.g. Oculus)
- Be sure you have installed "XR Interaction Toolkit" for cross-device support
- For maximum performance, you can set project settings based on rendering and quality settings recommendations.
Are not these steps clear enough? Then check video tutorial for setting development configuration for Oculus Quest.
- Download and import / Install through Unity Package manager GameArter XR toolkit.
- Go to "Edit → Project Settings → Tags and Layers" and replicate there layers from this image.
- Go to "Edit → Project Settings → Physics" and replicate there Layer collision Mattrix settings from this image.
- Go to "Edit → Project Settings → Time" and set fixed timestamp to timestamp relevant preferred device screen HZ (e.g. "0.011111" for Quest)
- You can try functionality of XR Framework through an example scene. Video below is recordeed in version 0.1.
XR Rig
XR Rig is a gameobject representing a user playing an XR game or using an application. XR Rig associates everything related to a player, from camera, physics, movement, controllers, appearance, properties or skills.
XR interaction toolkit offers everything needed for XR Rig creation (XR components are available under menu Components → XR, under right mouse button → XR, and through scripts) and interaction. However, the toolkit is composed of many independent components which must be placed into the Unity project and properly configured. Such configuration of XR Rig is very time consuming, and beside XR components, it usually requires also some amount of a custom code.
GameArter's XR Framework takes partial independend XR components from XR Interaction Toolkit and connects them into bigger logical (but still independent) units. If you would like to see more about a work with partial XR components from Unity XR development toolkit, I recommend to follow videos from Valem. GameArter XR Framework uses the same scripts and components on background.
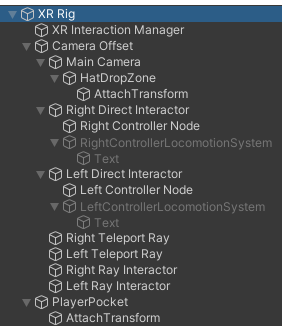
XR Rig GameObject components
XR Rig gameobject usually contains many gameobjects with many associated components. One such configurable, performance optimized XR Rig is available as a prefab inside folder "GameArter.XR". By a use of the prefab you may save hours of configuration and settings of your XR Rig. Of course, you can modify the rig from prefab according to your needs, or create your own. GameArter.XR Framework is written in a design that allows that.
XR Rig hiearchy (for XR Rig from GameArter.XR Prefab)
- XR Interaction Manager
XR interaction manager script acts as an intermediary between Interactors and Interactables in a scene.
- Camera Offset
- Main Camera
GameObject of Main Camera and its settings. This GameObject represents possition of VR headset in teh space. Do not forget to have attached Tag "Main Camera" to this gameobject.
- HatDropZone with Attached child
Drop zone to keep things on the head (e.g. hat)
- HatDropZone with Attached child
- Right and Left Direct Interactor
GameObjects representing position of right and left controller in a space and allowing direct interaction (grab something)
- Right and Left Controller Node
Controller visual - either animated hand or controller. XR Framework contains controllers visual for devices Oculus, HTC, Valve and default basic controller if none of previous is detected. Developer can configure, whether XR framework has to show hands, controller, or both (switchable each other under some logic. Selection of default visual to display is possible right in inspector of this GameObject (component HandController.cs script, option display. If selected, controller is displayed. If not, hand is displayed.
If you prefer own visuals, simply replace them for this GameObject.
- Right and Left Controller Locomotion System
Graphics interface informing user about selected locomotion system on switching between them (if there is more active locomotion systems which are switchable each other by one button).
- Right and Left Controller Node
- Right and Left Teleport Ray
GameObjects representing position of right and left controller in a space and containing visual for teleportation locomotion system.
- Right and Left Ray Interactor
GameObjects representing position of right and left controller in a space and allowing interaction for longer distances and with XR UI.
- Main Camera
- PlayerPocket with attached child
Drop zones on player's body. You can duplicate these layers and keep any number of drop zones you need. Drop zone may simulate e.g. a pocket inside which a user can keep game items.
XR Rig Configuration
All important XR Rig components are placed right in the hiearchy which is necessary for freedom of modification of any component. Every GameObejct from the list above contains many customizable options which may be easily changed through its inspector window.
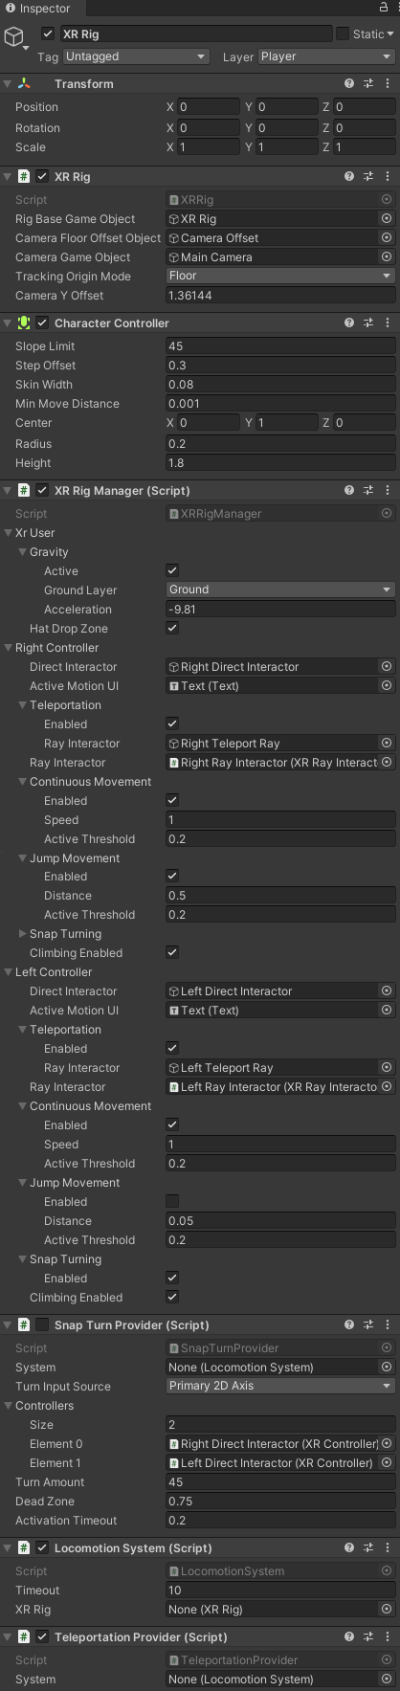
XR Rig inspector window then offers independent user's configuration and configuration of active features (selecting which features have to be active and which not helps keep the app is a state you prefer + keep better performance of the app.
Components Transform, XR Rig, Character Controllers, Snap Turn Provider, Locomotion System and Teleportation Provider are either native Unity or XR Toolkit based scripts without any modification. However, they must be placed right in the GameObject either for a reason of free setup or to guarantee functionality of active features. If the components are not necessary, XR Framework will disable them on startup.
XR Rig Manager description
XR Framework can be activated / deactivated by enabling / disabling this "XR Rig Manager" script.
- Xr User
- Gravitation
Enabling / Disabling gravitation acting on the user's object (XR Rig). Ground Layer serves for Ground settings, Acceleration input for gravitational acceleration.
- Hat Drop Zone
Enabling / disabling the drop zone located on the head.
- Gravitation
- Hand controllers (right and left, configured separately)
- Direct Interactor - keeps Direct Interactor gameobject of XR Rig
- Active Motion UI - keeps graphics interface gameobject of controller visual attached to Direct Interactor of XR Rig
- Teleportation
- Enabled - teleportation is enabled / disabled with the use of the controller
- Ray Interactor - RayInteractor gameobject of XR Rig used for teleportation
- Ray Interactor - Ray interactor gameobject of XR Rig used for remote interaction
- Continuous Movement
- Enabled - continuous movement is enabled / disabled with the use of the controller
- Speed - speed of continuous movement
- Active Threshold - minimum required compression of button attached to continuous movement to activate it
- Jump Movement
- Enabled - jump movement is enabled / disabled with the use of the controller
- Distance - distance about which to move a player on jump movement activation
- Active Threshold - minimum required compression of button attached to continuous movement to activate it
- Snap Turning
Enabling / Disabling Snap turning on the controller. Snap Turning allow to rotate the user by a defined angle.
Snap Turning is processd by "Snap Turn Provider" component placed in XR Rig game object - which is also palce where is possible to make any setup (activation button, rotation angle...)
- Climbing enabled - Activates / deactivates scripts required for climbing (interaction with obects with attached ClimbInteractible script)
Control settings
Controls of any feature may be set in Inspector window of a gameobject of the purpose, or through a script if direct change is not possible. Scripts that handle the function are located directly on the object (if they drive the single task only), or on parent element if they manage interaction of more child components. For example, detection of hand controller to display + option to switch between hand and controller is attached right to Right / Left Controller Node gameobject (HandController.cs script), while full management of locomotion systems is inside "XRRigManager.cs" script attached to XR Rig game object.
By default, all locomotion systems (teleportation, continuous, jump, snap turning) are controlled by 2D axis controller, while a user selects active locomotion system on the controller by pressing the 2D axis input. (2D axis = (thumbstick / joystick / touch...), see XR Input manager.
XR Interactible components
XR Rig (User) can actively interact with any item that have attached some kind of XR intractible component (XR Grab Interactible, XR Base Interactible, XR Simple Interactible ...) + standard components such as collider and Rigidbody. To avoid unwanted behaviour, be sure that all grabbable components have attached layer "Grabbable".
Helper scripts (GameArter.XR/scripts/Helpers
- InteractibleExternalModel.cs - Simplifies adding of imported interactible models int o the scene. If attached to the gameobject, automatically changes model's layer to "Grabbable", attaches RigidBody and XRGrabInteractible component + checks existence of a collider. Also link childobject "Pivot" (if exist) with "AttachTransform" property of XRGrabInteractible component.
- ClimbInteractible.cs - Simplifies adding of interactible objects suposed for climbing. ClimbInteractible is written at the top of XRBaseInteractible component - it extends it for some logic required for climbing. In addition, it automatically attaches RigidBody component and do aa check for existence of a collider. This script is everything what needs to be attached to stones on the rock, ladder rungs and other objects which may be used for climbing. (NOTE: climbing will work only if is enabled in the controller configuration).
- XrInteractibleCanvasCheck.cs - based on linked eventSzstem and mainCamera objects, it checks whether everzthing is set properly for possible interaction between XR Rig and UI Canvas elements.
- XrGrabInteractibleOffset.cs - Script which extends XrGrabComponent for functionality if grabing objects in a certain place (based on defined Pivot).
Independent resources
Independent resources (GameArter.XR/Independent Resources) have nothing related to XR Framework iteself, but they are useful in many projects. Basically, they are available in a form of Prefab which may be simply added to the scene for getting information right in VR space, during a test with VR headset.
- FPS Counter - Prints FPS in realtime
- Input Tracker - Prints state (value) of all active inputs in realtime
Availability & Next development
This framework is released under MIT licence, free to use for everyone. It's being developed continuously based on my needs and clients requirements. If you would like to contribute to the framework, you can post your contribution on Github. If you have a tip for anythinw which sould be added, you can send it at [email protected]. However, take into account, that adding is not guaranteed.
Roadmap (planned improvements)
- Improved behaviour and bugs fixation of locomotion systems mechanisms
- Better visual of teleportation, improved behaviour
- Make Drop zones functional also in a builded version (currently they work in editor mode only)
- Controller of motion sickness risk moments
- Manifest with rules to achieve maximum possible performance
- More advanced animations for hands
- Performance optimized, realistics, well looking human body