Dev tools
Android builds with Unity - dev environment configuration
Complete guide for Unity to start development of Android games.
Setting environment for simple option of building and testing games made with Unity on devices powered by Android may seem be complicated for developers without previous experience. This section brings basic step by step tutorial explanation of installation and settings of all necessary components.
Android, Java & SDKs. Setting development environment for games designed for Android devices is far more complicated than building games for web and standelone devices (PC). This is given especially from need to configure Java environment, Android environment and at the end also device for testing (Android device).
- Build and run projects directly on mobile screen
- Mirror screen on remote device without need of building project
- Build project without errors
Unity setup for Android games
- Java installation
- Installation of Android SDK and NDK
- Setting Unity
- Android device configuration
- Conclusion
1. Java installation
Java is popular class-based, object-oriented programming language. This language is base programming language of Android operation system and many other tools and software forming Java platform. In short, without installed Java, there is not possible to develop for Android.
-
Downloading Java platform SDK (JSDK)
Java can be downloaded via Java SE section on Oracle website. In the time of writing this, the latest Java SE version is 12.0.1. However, Unity supports only JSDK in version 8 and below.
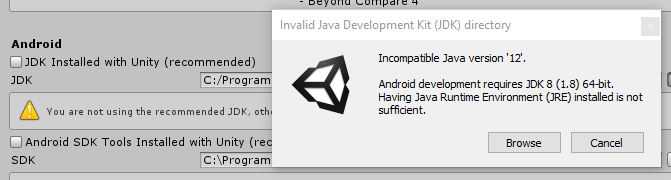
Java SDK in version 8 can be downloaded from archive JSDK download section. Oracle require a registration for downloading older version of its GSDK so be ready for it. Personally I use JSDK kit in version 8u212 for Windows x64.
Download JSDK version for your OS (32bit/64bit) and install it to the recommended location. (Usually C:\Program Files)
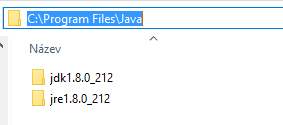 Installed JSDK in PC
-
Setting pathes and environment variables for Java
For possibility to use Java in the PC, there is need to set environment variables. This may be done via a command line or Windows UI. In both cases, there is need to be an administrator.
- If you prefer command line, press Win key and search for "cmd" which must be opened in administrator mode (right mouse button → open as administrator).
- If you prefer UI, open Environment variables window as administrator on basis of OS you use. This window consists of 2 sections. We are interested in System variables section (at the bottom).
For right functionality of Java platform in your PC, there is need to create / update 2 pathes related Java:
- JAVA_HOME. Link this variable to root directory of installed Java. See Screenshot
- java variable. Environment variable "java" must be added via "edit" option between other Paths and linked to "bin" folder of JSDK. See screenshot
Right now Java should be properly installed and set. You can verify it in command line (cmd) by writing following requests:
- "java -version" to check installed version of JSDK
- "echo %JAVA_HOME%" to get path of JAVA_HOME environment variable
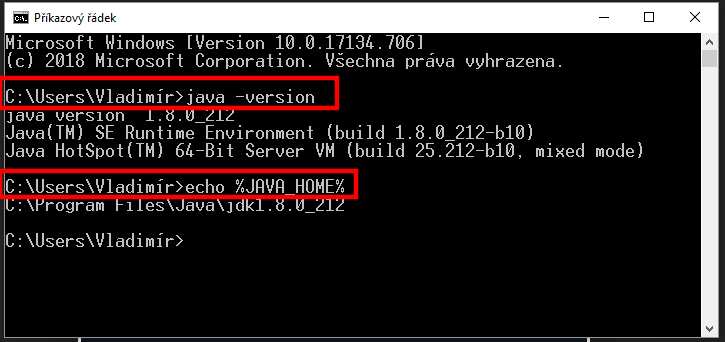 Installed JSDK version and path in PC
If "echo %JAVA_HOME%" prints only "%JAVA_HOME%" although it is set as global system variable, try relanch Command prompt.
2. Installation of Android SDK and NDK
2.1 Installation of Android SDK
-
Downloading Android SDK Tool zip file
Like in the case of Java, also here we must select the right Android SDK version. According to Unity build, Unity requires Android SDK tool in version 26.1.1 and above. (Unity 2019.1.0f2)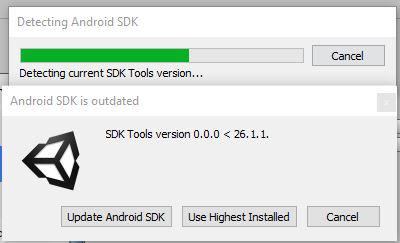 Installed JSDK version and path in PC
According to Android SDK release notes, Android SDK in version 26.1.1 (Release date on September 17) we can notice, that this is only supported version of Android GSDK by Unity in the time of writing. This Android SDK tool can be downloaded in download section - Android Studio downloads. (Section "Command line tools only" located at the bottom, do not download all Android studio).
Downloaded SDK package, selected on basis of OS, is in a .zip file.
-
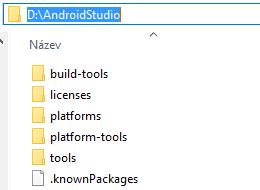
Unzip Android SDK to selected directory
Unzip downloaded file and move its folder "tools" to any location you want. On basis of selected location, you may need to administrator access for next steps again. Personally, I created a new folder "AndroidStudio" in "D:\AndroidStudio". -
Downloading packages for Android SDK
Go to just unzipped folder "tools" and its subfolder "bin". You should find file "sdkmanager.bat". This is file we must access over command line - this file allows to download all necessary packages for Android SDK. Download is quite simple, via 2 following requests from command line:- sdkmanager.bat --list
- sdkmanager.bat "build-tools;28.0.3" "platform-tools" "platforms;android-26"
After accepting terms, all required packages should be installed automatically. If installation is stuck at 10%, then you need to run the requests as administrator.
Beside previously created "tools" folder, the folder must now contain Android SDK package folders.
 Android SDK Package folder
2.2 Installation of Android NDK
Since August 1, 2019, all apps on Google play need to have support for 64-bit devices. This support is delivered by building apps with IL2CPP scripting backend. For possibility to use IL2CPP scripting option, we need to have installed Android NDK library in our PC (if we do not build via Unity cloud service). Android NDK can be easily installed by following way:
-
Downloading Android NDK zip file
Like in the case of SDK, we need to be careful in selecting version. In the time of writing this (May 2019) and Using Unity 2019.1.0f2, There is maximum NDK version supported by Unity with number 16, see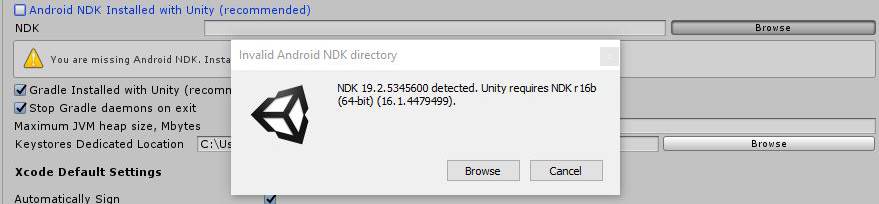 Installed Android NDK version and path in PC
Android NDK Version 16 (or any other version including the latest one) can be freely downloaded from NDK library archive.
Downloaded SDK package, selected on basis of OS.
-
Unzip Android NDK to selected directory
Unzip downloaded file to selected location Personally, I created a new folder "AndroidNDK" in "D:\" (D:\AndroidNDK).
3. Unity setting
- Link installed libraries (Java, Android) with Unity
- Set mobile build
-
Build Settings
In Unity, go to Build Settings (File/Build Settings) and switch to Android platform. If is not installed, install it. Then, via button "Player Setting", go to section "Editor" and switch Device (1st line) to "Any Android Device". This option will mirror your computer screen at your android device via USB cable. -
Unity External tools settings
Go to Edit/Preferencies and switch to External Tools tab. There is need to set right pathes to installed Java and Android library. This may be done by unchecking checkboxes for JDK and Android SDK and filling own pathes.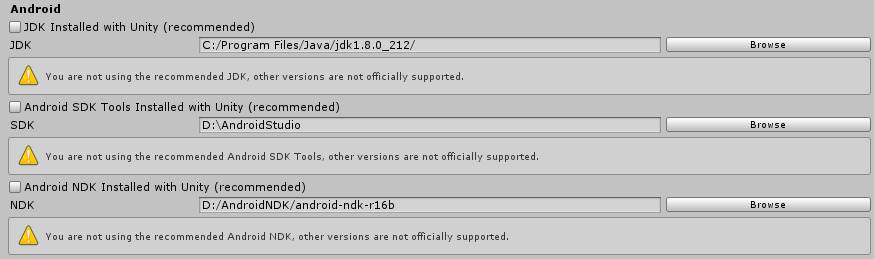 Unity settings for external tools
4. Android device configuration
- Unlock Deceloper mode
- Enable USB debugging
- Install app for Remoting
-
Unlocking developer mode
Developer mode can be usually unlocked in Settings / About section, after tapping 7 times at build version. Once developer mode is unlocked, there is one new tab inside settings menu - called e.g. "developer options".
In a case of problem, google for unlocking developer mode for your device. -
Enabling USB debugging
Android devices with unlocked developer mode has one more tab inside settings menu. One of items inside these developer options is USB debugging. Be sure it is enabled. -
Unity remote app
For option of missoring PC screen at your device on going to play mode, there is need to download and install Unity Remote 5 app. Search for this app on Google Play.
Conclusion
It's all. Congratulation for great work. Right now:
- There should be able to build android applications
- On Build and run option, built app should be opened in your android device
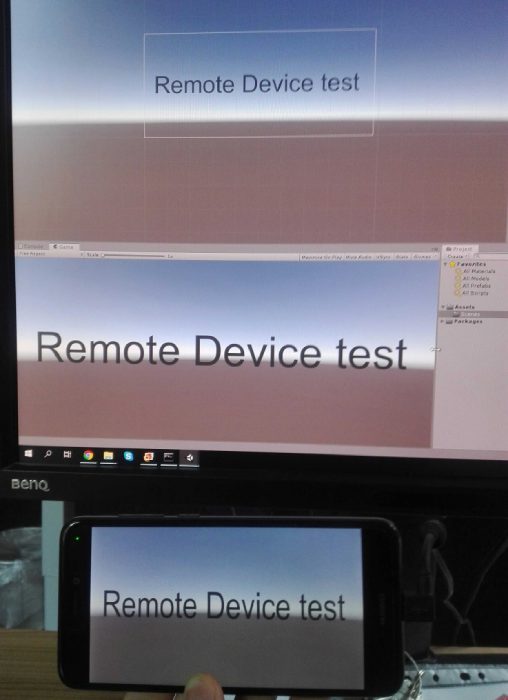
- On pressing play mode, PC screen should be mirrored on your android device screen. See photo.